Create Calibration
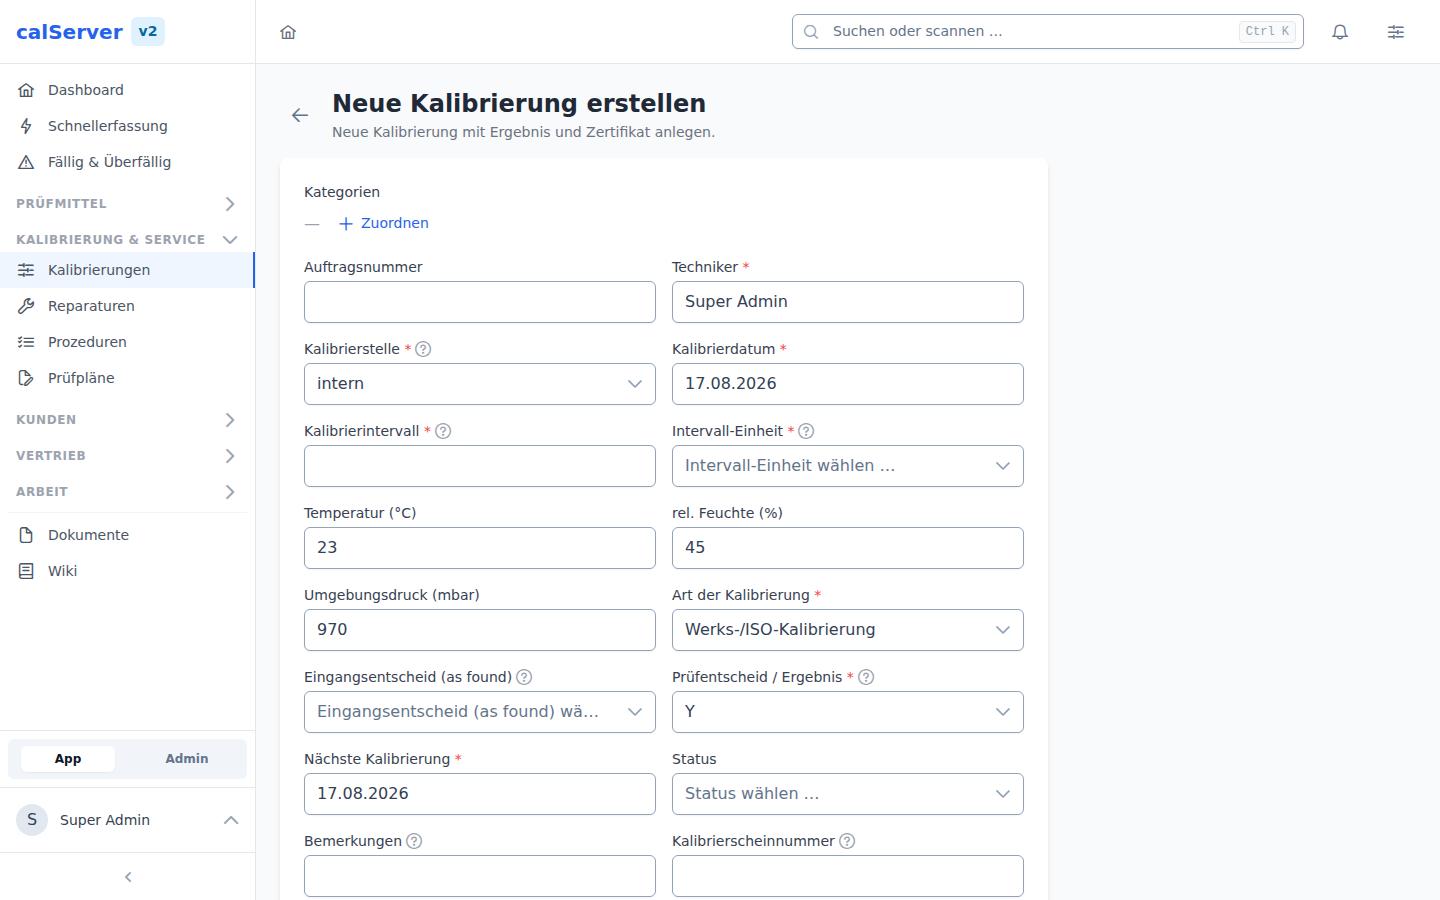
New calibrations are created on the page /v2/calibration/create. The form is rendered by the DynamicForm component, which provides all C23xx fields from the field configuration.
Inventory Link
Every calibration must be assigned to an inventory item:
- In the Inventory Item (MTAG) field, select the device to be calibrated via the autocomplete search
- Search by inventory number, serial number, manufacturer, or model
- After selection, the device data is displayed automatically
Required Link
A calibration cannot be created without a link to an inventory item. If needed, create the device in the Inventory first.
Calibration Fields
Required Fields
| Field | Metrology Code | Description |
|---|---|---|
| Calibration Date | C2301 |
Date of execution |
| Next Calibration | C2306 |
Due date of the next calibration |
| Result | C2316 |
Calibration result (passed / failed / conditionally passed) |
Important Optional Fields
| Field | Metrology Code | Description |
|---|---|---|
| Measurement Uncertainty | C2320 |
Expanded measurement uncertainty of the calibration |
| Procedure | C2333 |
Applied calibration procedure |
| Technician | — | Performing calibration technician |
Current Record and Support Calibrations
Of all the calibrations on a device, exactly one is the current record. It answers which certificate counts, and it supplies the calibration date and due date to the device — that is, to the inventory grid, the due-date filter and the dashboard tiles.
A newly recorded calibration automatically becomes the current one; its predecessor loses the flag. This applies to every way a calibration comes into being: this form, quick entry, the table import, the METTEAM sync and the API. Every entry stays in the history — only the flag moves.
This is controlled by the Current Record field (C2339):
| Value | Effect |
|---|---|
| Y (1, default) | The calibration becomes the current one and moves the due date forward |
| N (0) | The calibration is saved without moving the valid certificate |
Support calibration for drift monitoring
When an intermediate measurement is taken between two regular calibrations to observe drift, set Current Record to N. The measurement is recorded in full and appears in the history, but the currently valid calibration date — and with it the due date — stays unchanged. Without this, every support measurement would push the deadline out.
The flag can also be moved afterwards: open the calibration you want via Edit and set Current Record to Y. The previously valid one loses the flag automatically, so you can return to an earlier calibration without deleting anything.
Display in the list
A device's calibration history is sorted chronologically, newest first, with the valid row marked separately. It is therefore not necessarily at the top — with a support calibration the valid one deliberately sits below it.
Calculating the Next Calibration
The due date is derived from calibration date + interval × interval unit. Whenever one of those three changes, the form recalculates the date — including when the interval only arrives through the selected device.
When creating a calibration this happens without asking: the fields are empty or were prefilled by the form itself.
When editing an existing calibration, the form asks as soon as the recalculated date differs from the one already entered:
- Keep — the entered date stays as it is (e.g. a date taken from the laboratory's certificate or a deliberately shortened interval)
- Recalculate — the date is derived from the changed interval
The dialog shows the old and the new value side by side. If the calculation yields the same date, no prompt appears.
Applies to every calculated field
The same prompt appears for any field whose default value is derived from other fields — which ones those are is defined by the default value in Field Management.
Assign Technician
The responsible technician is selected via a dropdown field. All users registered in the system with the Technician role are available.
Customer Assignment
Automatic Customer Inheritance
The customer is automatically inherited from the linked inventory item. Manual customer assignment is not required for calibrations.
Select Procedure
A predefined calibration procedure can be linked via the Procedure field (C2333):
- Select an existing procedure from the list
- The associated test steps are automatically applied
- More information under Procedures and Test Steps
Upload Certificate
After completing the calibration, a calibration certificate can be attached as a document:
- Supported formats: PDF, JPG, PNG
- Maximum file size: depends on server configuration
- Multiple documents can be uploaded
Submitting the Form
- Fill in all required fields
- Click Save
- Upon successful creation, you will be redirected to the calibration detail view
- In the detail view, you can then add Measurement Results and Specifications
Create Calibration from Inventory Detail View
You can also create a new calibration directly from the inventory detail view. The inventory item will be pre-selected automatically.